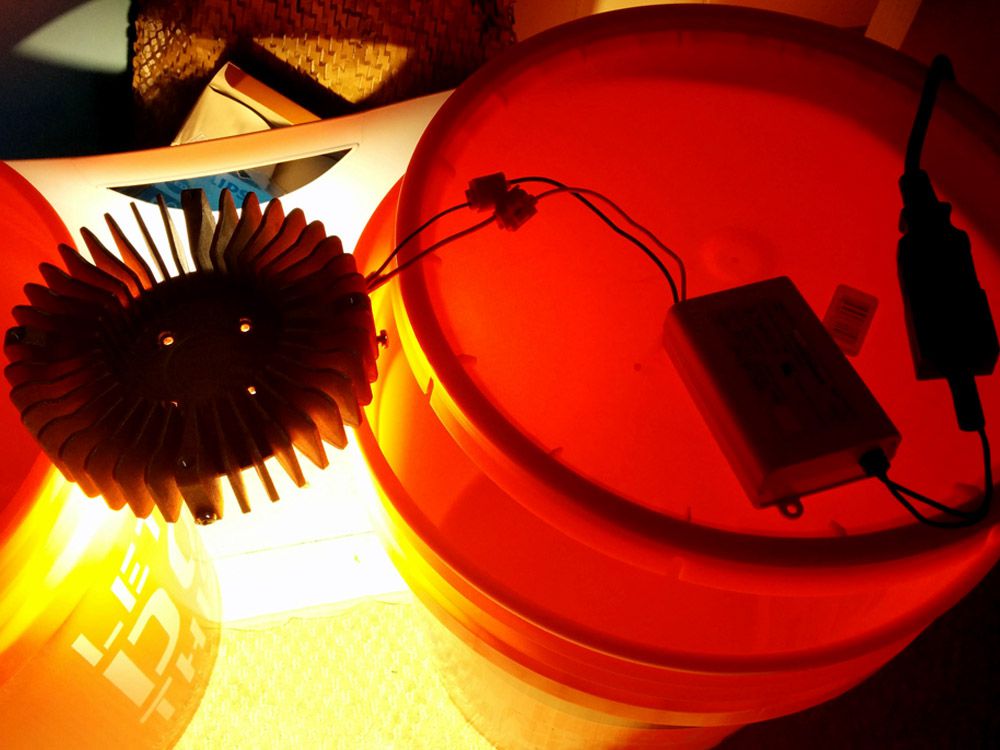
BUCKET ASSEMBLY The assembly is standard stuff. I used a box cutter to cut the bottom off of two buckets. Two upper bucket portions make up the light top, along with a lid that had holes for the LED and the heatsink mounting screws. A hot knife would have worked better. A space blanket was used for reflective mylar on the inside. It works but was hard to install; I prefer white paint. Black duct tape covers the outside.
COST ESTIMATES The total cost of the light is around $50. Switching to a Vero 29 would approximately double that. The fan PCB has about $5 worth of parts on it, and the fans were about $20. In total, there is less than $100 in the bucket itself, though I spent more and have extra parts and materials for the next bucket (including 100 of the fan power boards!). The modular design means that most of the parts are reusable.
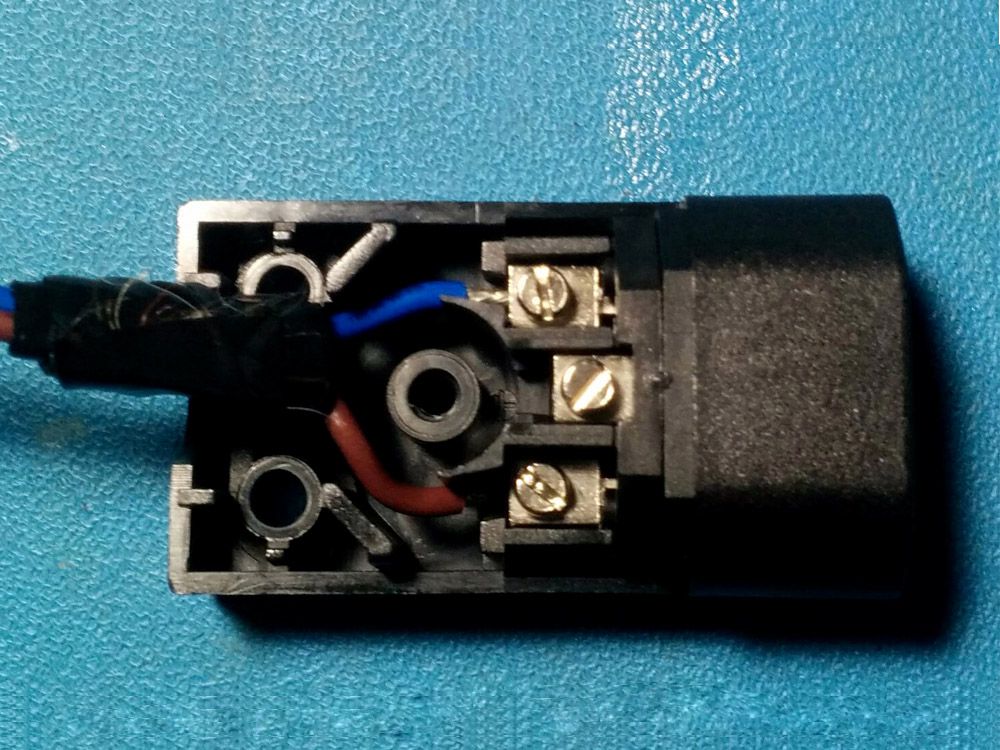
ADDRESSING SAFETY I plug the bucket into a
GFCI outlet in case anything were to short. You can and should buy
separate GFCI adapters if you don't have a GFCI outlet. Additional fuses, especially thermal fuses if the LED overheats, would be beneficial and I intend to add them soon. Making sure all wires are strain-relieved and taped down is important to ensure that, if they come loose, they don't short to anything.
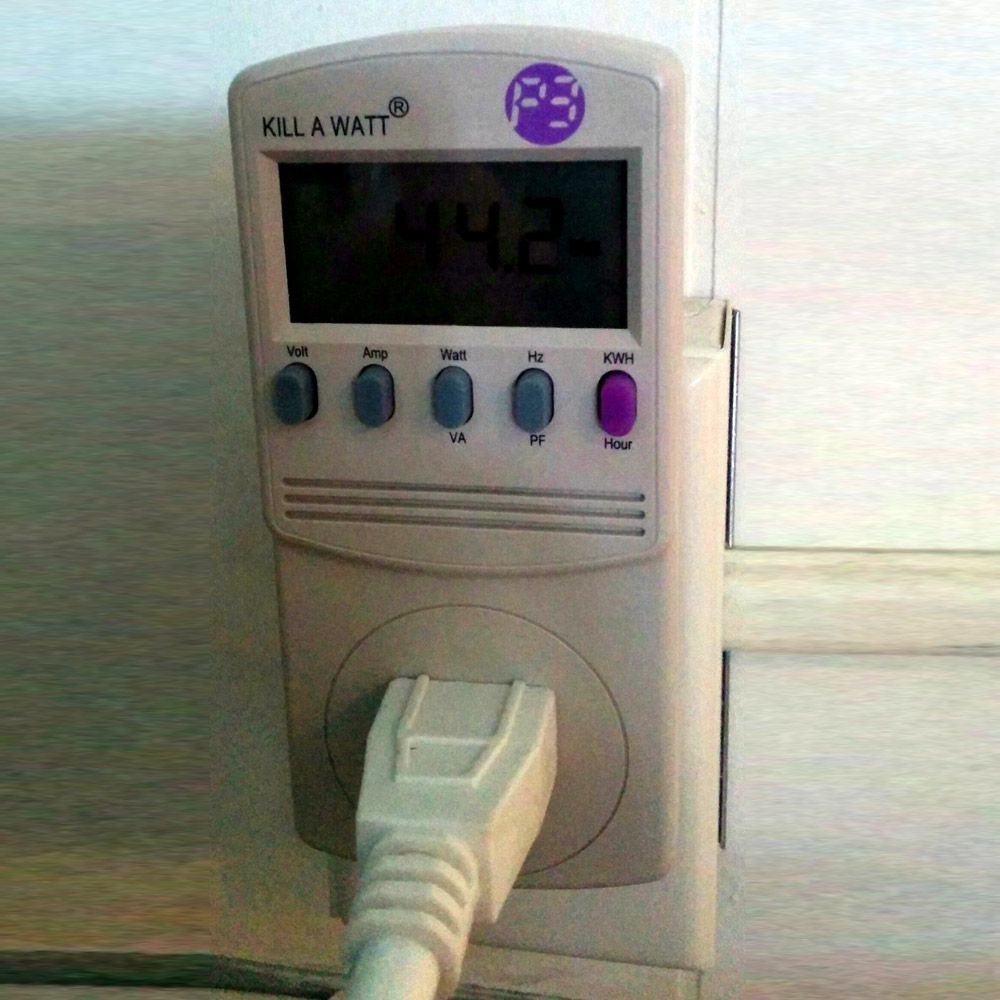
POWER CONSUMPTION We can read all about lm/W of LEDs, but ultimately we care how much power we'll have to pay for from the utility. Here are the power measurement for this bucket 'at the wall' usining a
Kill-a-Watt power meter: light only: 38.4W; light + fans: 44.2W. I pay $0.18/kWh for electricity, so if I run the fans 24 hrs./day and the light 18 hrs./day, I pay about $4.50/month to run this bucket. This is somewhat better than CFLs. Assuming I'm getting around the rated output of 3662lm, that puts the light at about 95 lm/W including power supply inefficiency.
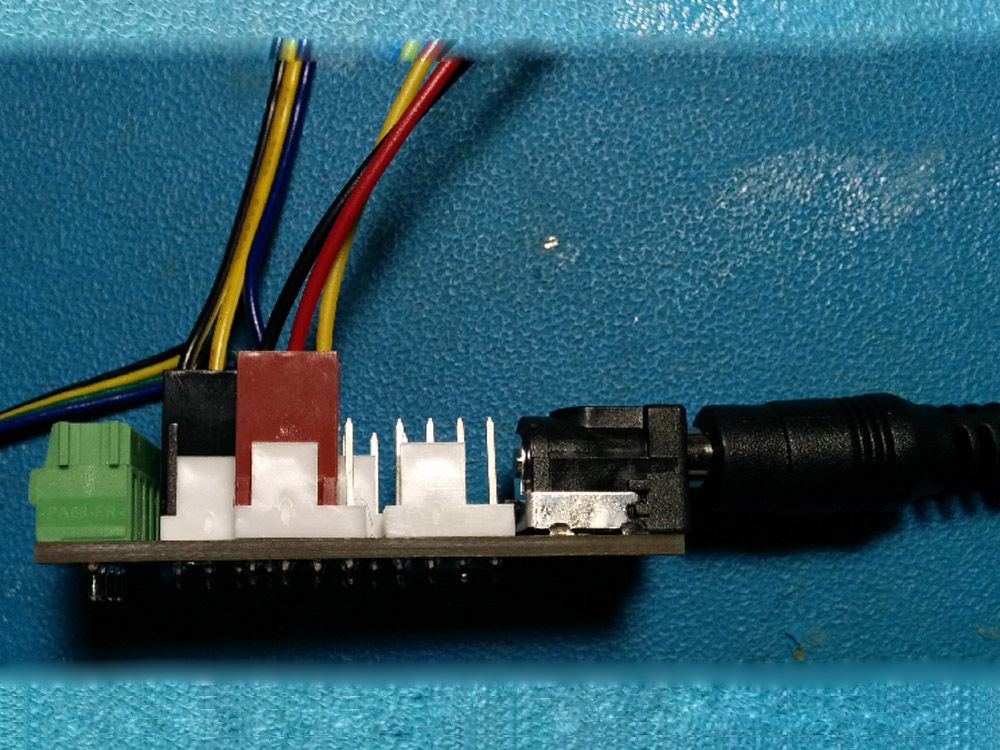
FAN POWER In keeping with the goal of a no-solder build, I designed and built a small circuit board to distribute 12V power from a wall wart to 4 4-pin pc fan connectors and a screw terminal. (Technically I did solder the board, but I set the rules so I'll allow it :).) Plug in the wall wart's jack and the fans and you're done, no cutting and splicing. This also has the benefit of being able to unplug the fans, allowing me to totally separate the light top from the bucket itself. I will eventually also use the 12V output on the screw terminals to power an LED strip. This board is very simple, but provides an easy way to distrubute 12V around the bucket.
LIGHTING CONFIGURATION
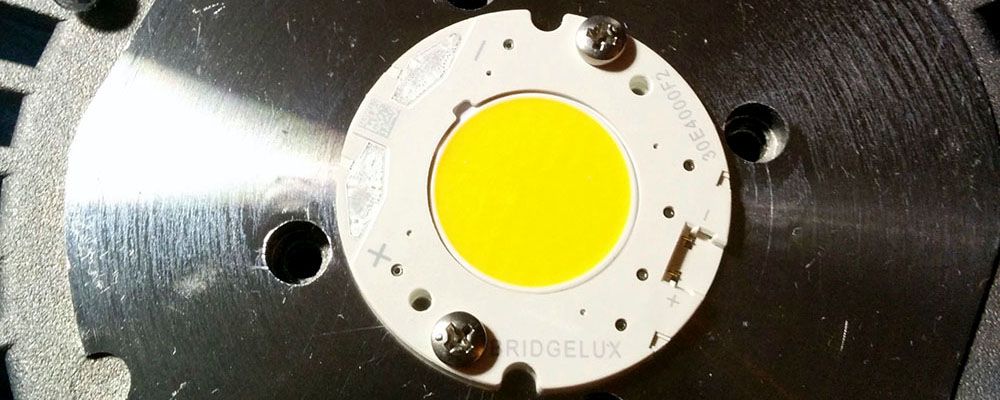
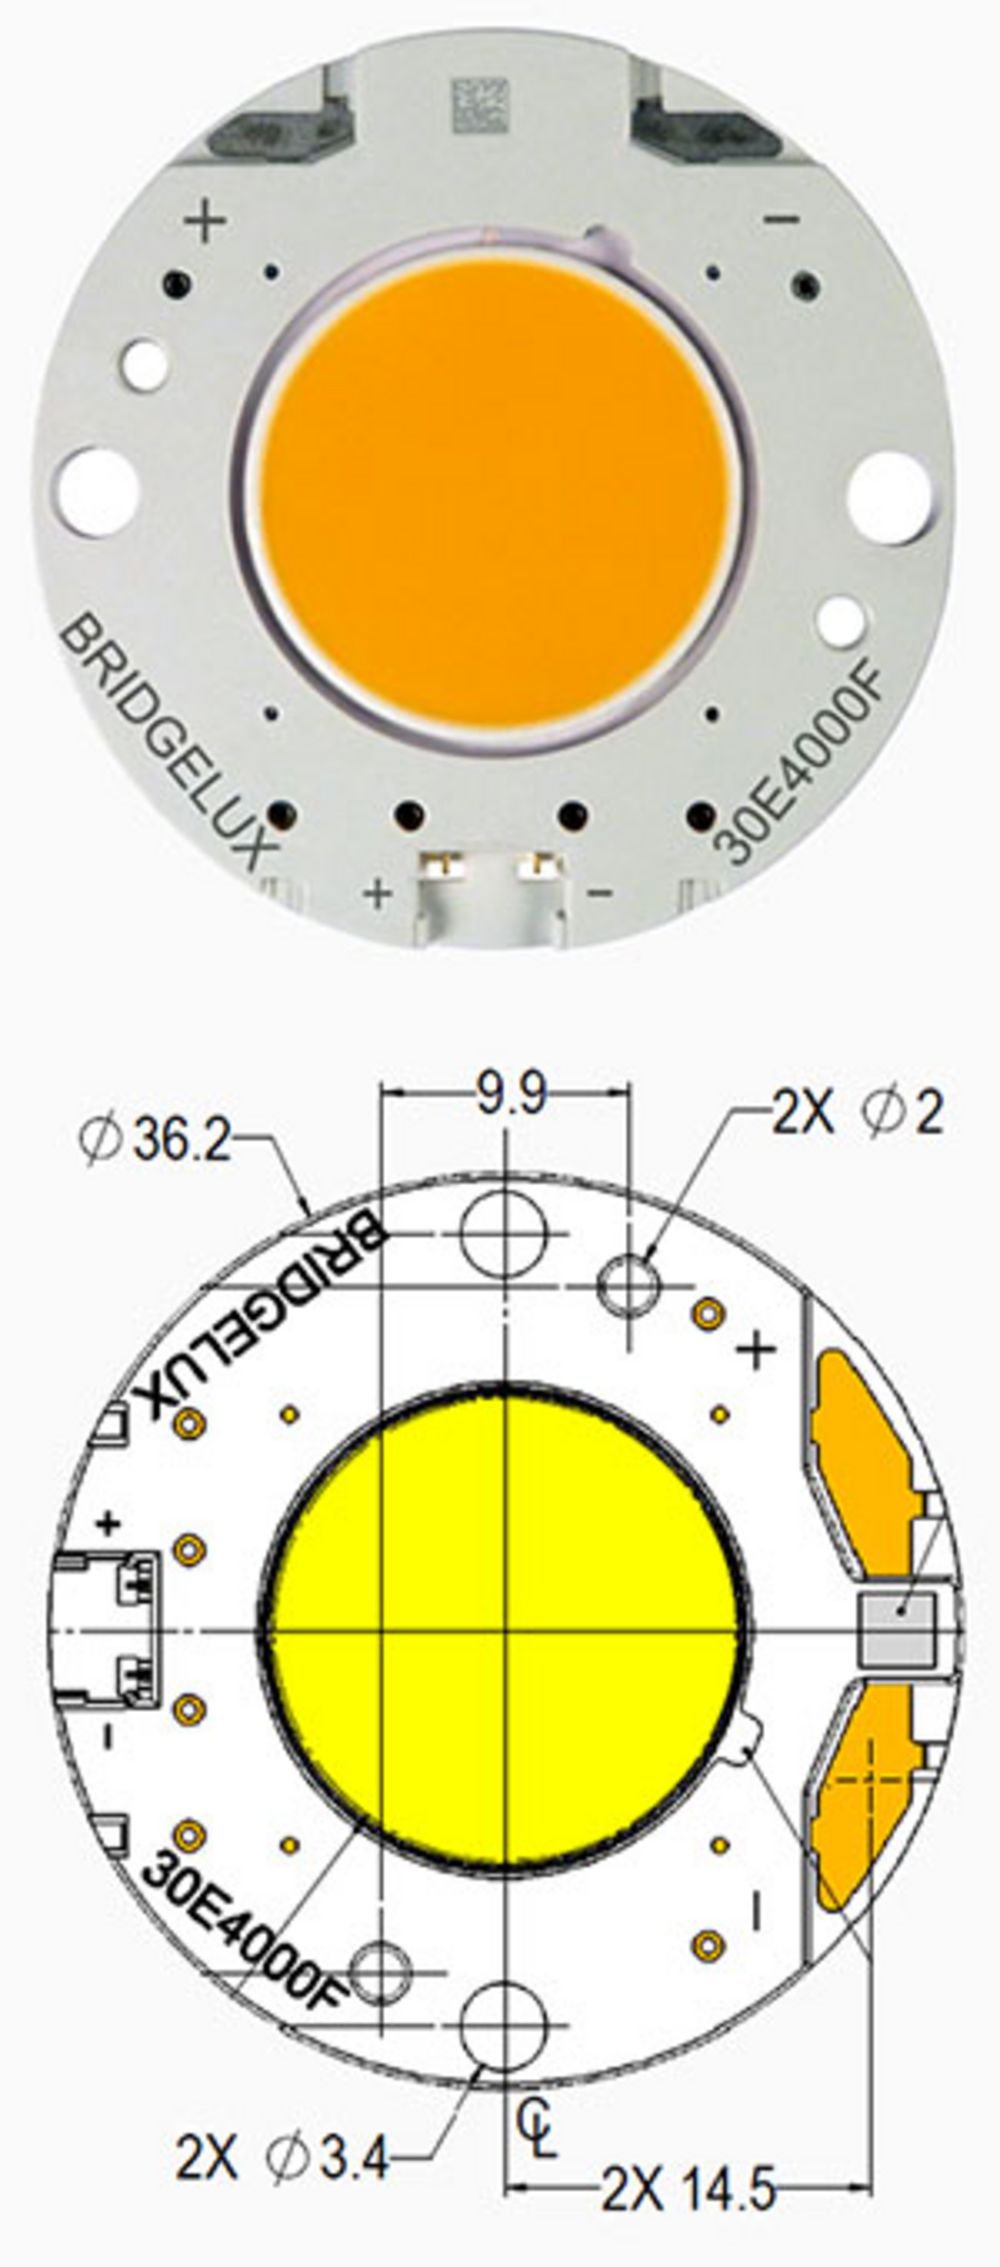
From the beginning, I planned to use LED COB arrays because they provide a lot of light with low cost and low power consumption. COB stands for 'chip on board,' meaning it contains an array of multiple LED chips in a single package. One example is the '100W LED' you commonly see on eBay. COBs are used for LED downlight and spotlight fixtures, so their directional nature is perfect for a Space Bucket.
Based on guidance from
SAG's light guide, I wanted to have about 40000 lux to hit a sweet spot of photosynthetic efficiency vs. electrical efficiency. That is, more light is both harder for the plant to convert to energy and harder for the light to produce efficiently.
Assuming a 30cm diameter bucket and 20% loss, I would need about 3600 lumens of output (lux=lumens/area). I ultimately selected a
Bridgelux Vero 18 with a 3000K color temperature, nominal 3662lm output at 1.05A drive current, and 122 lm/W. Not too shabby! Note that the
standard Space Bucket setup of 4 23W CFLS produces about 6400lm, but the LED output is more directional and the goal for this build is to use as little light as possible. These are ballpark calculations to figure out a minimal amount of white light needed, YMMV depending on spectrum, plant selection, desired outcome, etc. If you want maximum output, you could build a similar light using a Vero 29, the largest Bridgelux array, with appropriate heatsink and power supply.
POWER SUPPLY
LEDs are characterized by their forward voltage and forward current, and COBs are no different. You should use an efficient AC-to-DC constant-current supply with COBs to avoid thermal runaway and perform gracefully if the LED array partially fails. Pick the current you want, and ensure that your supply can provide that current at the required forward voltage. If it can't, look for a supply with a higher power rating.
The Vero 18 is characterized at 700mA and 1050mA. I tried both currents and ultimately settled on 1050mA because it is the recommended current (and the one required to get the output I wanted), and it didn't make the heatsink too hot to touch continuously (see THERMAL MANAGEMENT below). There are lots of driver options on eBay and Ali Express, but I prefer to buy components with proper regulatory certifications and someone I can complain to if things go wrong. I selected the
Mean Well APC-35-1050. Its typical efficiency is 84%. You can spend more and get better efficiency or features like dimming or power factor correction, but this was good enough and very inexpensive.
THERMAL MANAGEMENT
The Bridgelux Vero series has another benefit, which is that there are a lot of supporting products on the market. Aavid Thermalloy makes
heatsinks for the Vero series that already have the mounting holes drilled and tapped. Their heatsinks are compatible with their Nuventix synthetic jet coolers, which use a piezo diaphragm to pulse air through the heatsink fins to increase their cooling capacity much like a heatsink fan. Their advantages are that they last longer than fans (why have a 30k hour led and a 10k hour fan?) and that they are quieter. Their disadvantage is that they are expensive.
I bought the Aavid Thermalloy 'Downlight 48W' heatsink that has mounting holes for Vero 18 and is the biggest one they make, hoping that it would be sufficient without active cooling. I also got a Nuventix SynJet cooler that fits it to try out. The LED is mounted on the heatsink using two M2.5 screws, with thermal grease in between. The thermal grease is the same stuff you use on a CPU if you build a PC, and it's necessary to ensure good thermal contact between LED and heatsink.
High power LEDs, including COBs, need heatsinks to keep the LED itself (junction temperature) below the rated maximum so you don't burn them out, and preferably as low as possible to maximize the LED lifetime. You can
estimate how hot the LED will get (temperature rise) based on how much power you're dissipating, the ambient temperature, and the thermal resistance of the LED package, thermal grease, and heatsink, but these calculations almost always make too many assumptions to be accurate. So using an
IR thermometer, I tested how much the temperature of the heatsink rose with two LED currents (700mA and 1050mA) and three cooling setups (no cooling, SynJet cooler, and PC fan). The full 1050mA with no cooling still kept the heatsink touch-able (below 50°C), and backing out the LED junction temperature from the heatsink temperature indicated the LED was well below its maximum temperature. The SynJet cooler worked, but not as well as the fan. And since it isn't strictly needed to keep the LED cool, a premature fan failure wouldn't be catastrophic.