reddit thread
I will fully admit that
I am a newcomer to the space bucket world. However, I have been a maker for many years. After doing some research, I decided that a DWC Hydro bucket would be the cleanest and easiest for me to manage. Stealth is not an issue in my household, but I wanted it to be very easy to maintain, and be very unobtrusive. It seemed to me that the highest maintenance item was changing the water once a week. Therefore I wanted this to be made incredibly easy. In that vein, I came up with a way to have the water bucket be just that, just a bucket, with no attachments, or cords to deal with. When it’s time to change the water, I mix my new nutrient and pH’d water in the empty bucket. Then, I simply lift the entire assembly off the old water bucket, and set it on the new one. If I don’t do it quick enough, I do have to re-prime the aquarium pump. I went with the smallest pump, and in my opinion, it’s a little underpowered for the 12 inches of vertical travel or ‘head’ that it needs to overcome.
Planning
The second consideration was light leak from the
UFO LED light. I’ve seen many pictures on space buckets, and realize that the greatest source of these light leaks is the fans in the side of the bucket. This is the reason for the black elbows in the parts list above. I trimmed the 80 mm fans to fit inside the elbows, and then installed the elbows to the side of the bucket. These will also serve the purpose of holding a carbon filter when I switch to flower. I understand that the fans may not be powerful enough for this, but I have a bit of time to plan and design for that. I also noticed that a lot of people like to modify the
UFO LED light assembly, I didn’t want to do this, and decided that the UFO sitting on top of the bucket would work reasonably well for me so that I did not have to modify it in any way. It is my intention at some point to further automate the system with an Arduino, and compatible sensors for TDS, pH, temperature, and humidity. However, it’s working just fine at the moment and I have other projects to finish first…
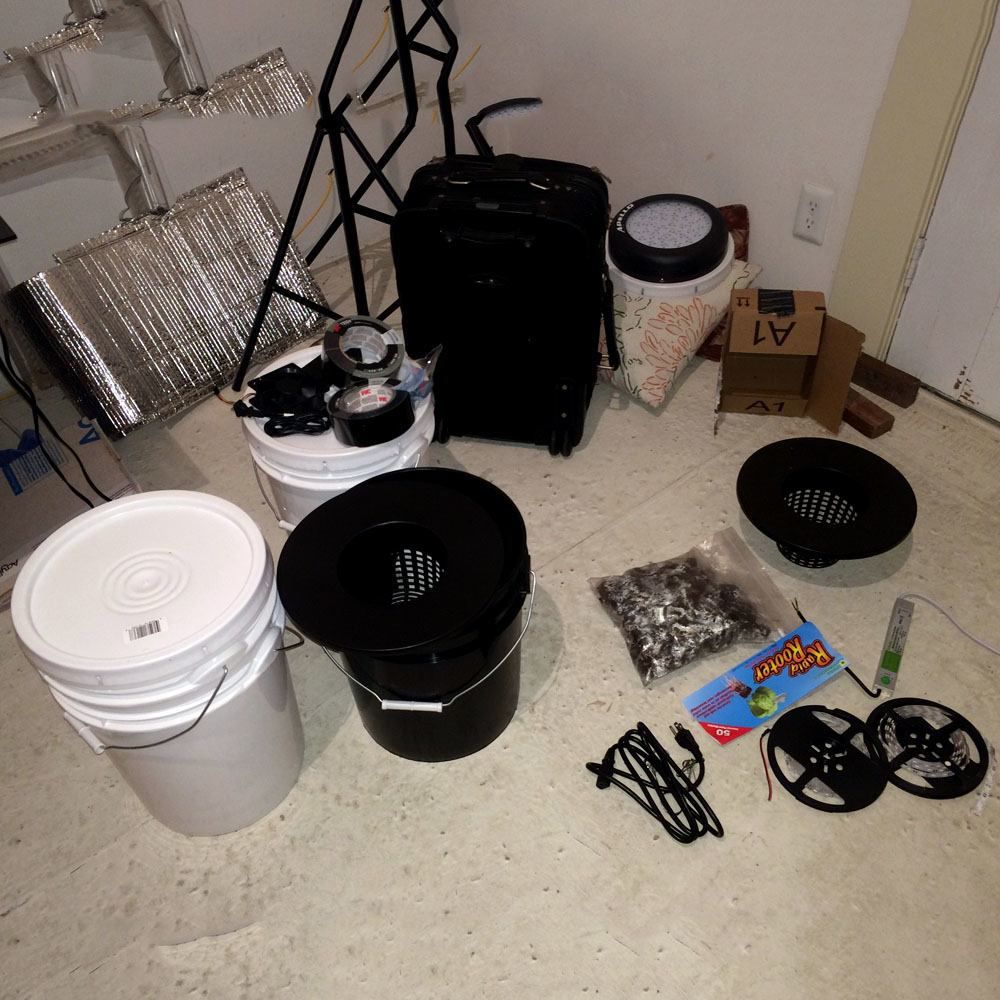
So, what we are going to create at this point is two different modules. One will be the Hydro module, and the other will be the light/fan module.
Assembly
Fan modification: Use the Dremel with a cut off wheel to trim the tabs from one side of one of the 80 mm PC fans. Then, proceed to trim the tabs off the opposite side of the other fan. You will probably need to do a bit of test fitting with the elbow, but trim off enough so that it fits in snugly but not completely jammed in.
For the fan that has the fan blades exposed outside of the elbow, do yourself a favor and zip tie a fan blade cover to it. I almost lost the tip of my thumb while checking airflow inside the bucket during assembly. In the end, it cost me a bit of blood, a small slice of pride, and the cost of another nine dollar fan.
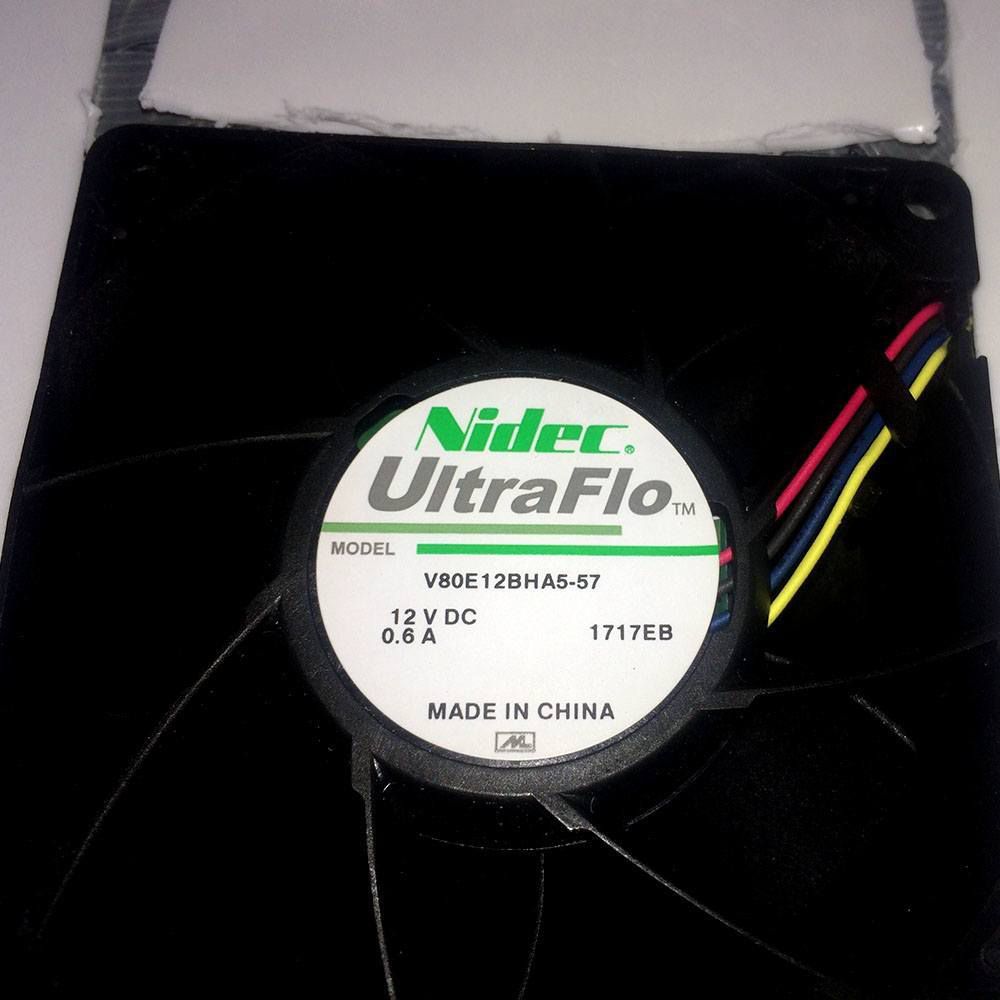
I recommend 4-wire fan because it has a speed control. If you’re not familiar with these, two of the wires are for power, one is a tachometer, and the other is a PWM speed control. You would need a micro controller to fully utilize this, but there is a very simple hack that I have used with no problems for this build. While researching how to figure out which of the wires was which, it was suggested that I simply connect the non-power wires one at a time to the ground wire. The PWM wire when attached to ground, will slow the fan down considerably. During the build, I simply attach this wire to the ground wires and it runs fine. The remaining tachometer wire is not used at this point in the project.
Light and fan module
I use the fan without the elbow attached to size the hole on the side of one of the white buckets towards the top. Cut this out just a little bit smaller than the fan size. Next, set the bucket on your workbench, place the fan inside the elbow, and then position the lower hole for the intake fan so that the elbow rests on your workbench along with the bucket. At first, I had it positioned too low, and the bucket would not rest on the workbench level. You want this for whenever you take the bucket off to admire your plant! You must also cut a hole in the bottom of this bucket so that there is about 1/4 inch left of the bottom. This is where the radius tool for the Dremel comes in very handy. I used the side cutter bit along with the radius tool to do this. It’s a slow process, and messy, so do it outside if it all possible. Have patience, take your time, and it will be a very smooth, round cut. While you have your radius tool out, you should go ahead and modify two of the white lids. Remove the locking strip from one of the lids, and cut it so that there is about a 1 inch lip on the inside of the lid for the UFO LED. Make sure that you cut the hole just big enough so that it does not block any of the light, but the UFO rests comfortably on it. The other lid will sit on top of the net pot, and you can leave the locking strip on this, as this will help it fit more snugly on top of the net pot. Cut the hole with the radius tool so that there is about 1/2 inch left of the lid for the light/fan bucket module to rest on. Set this lid aside and we will discuss it further when we get to the Hydro module.
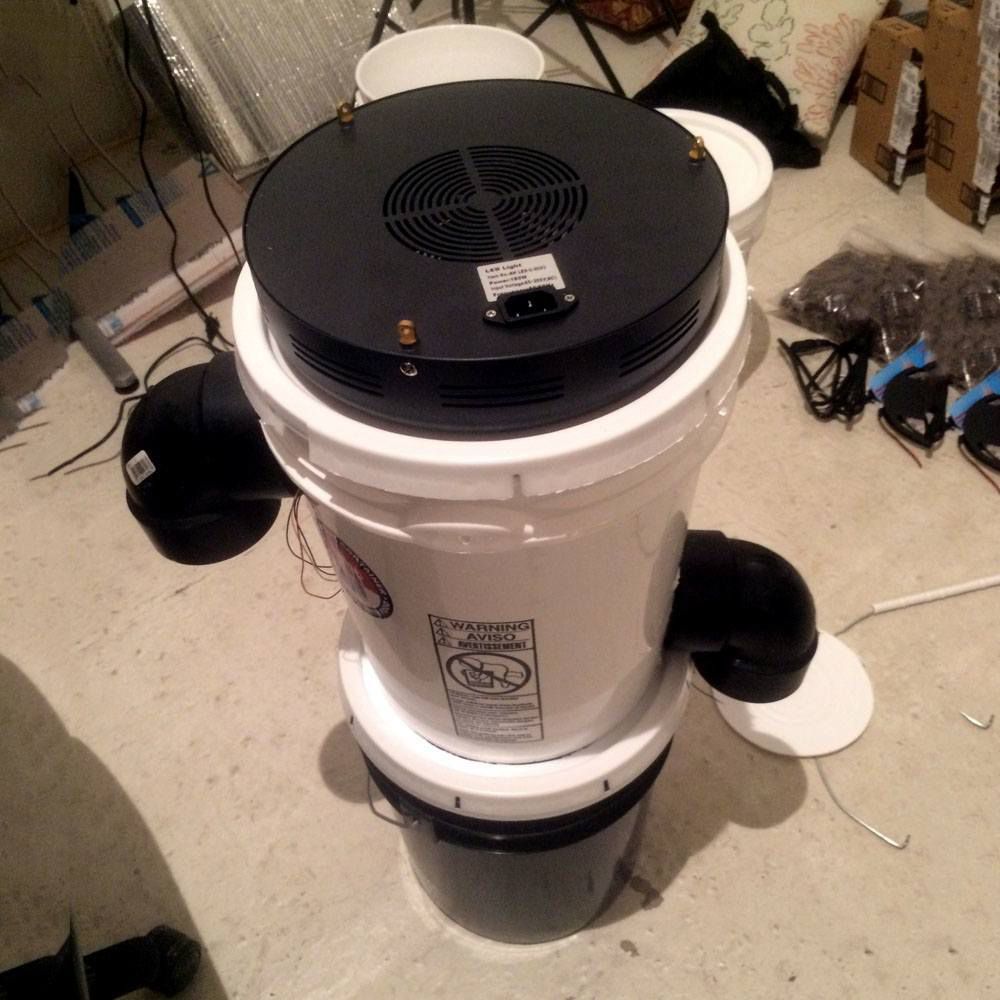
Now to install the fans! Push the fans into the elbows and adjust them so they are about 15° out of line with the bend of the elbow. Pop them into the square hole that you cut, and then turn the assembly so that the elbows are pointing directly down toward the floor. This will put the fans out of line with the hole, thereby locking them into place. After this is done, zip tie the fan cover to the top fan to save your tender digits from decapitation… Run the wires around the side of the fan and connect the positive and negative wires together. Connect the PWM wires to the ground wire. Then attach it to your power supply. I already had some Molex connectors for this, Feel free to connect these in anyway you deem safe. See the electrical safety guide in the space buckets forum if you’re uncomfortable with this part of the procedure. It is low voltage, so it doesn’t need to be over engineered. I chose white buckets for this part of the build so that I did not need to worry about reflectivity inside. The black duct tape is for light leakage and you can work on that now. It took me two layers to overcome the brightness of the UFO LED, YMMV. I also was careful not to put the adhesive from the duct tape on the wires for the fans, as I do intend to modify this so that I have control of the fan speed later. Eventually these will be put into shrink tubing and attached to the micro controller.
Be sure to tape the lids that you have modified, and check for light leaks in the entire system when it’s dark. Even if you are not concerned about the glow from the LED, you still want to seal as many light leaks as possible so that you don’t have problems when you switch to a 12/12 schedule for flower.
Hydro module
As mentioned above, I designed this part of the system for ease of water change out. The black buckets are unmodified to make this as easy as possible. The only thing that I might do to these buckets is a clear plastic sight tube on the outside so that I can monitor water level. Here is one possible solution: http://www.instructables.com/id/Sight-Glass-For-Hydroponics-Buckets/?ALLSTEPS Taking this into consideration, the net pot lid by itself is not stable enough to handle everything that we need for this part of the module, so we are going to heavily modify one of the black buckets for this. As an aside, I used a white bucket for this piece, but I have since changed the parts list to reflect using a black bucket as it will save you a lot of time and tape. Using the dremel with the cut off wheel, cut a three sided flap in the upper part of the bucket to slip the power plug from the aquarium pump through. Include a hole for the wire to sit in. This must be above the level where the bucket would nest inside of another bucket. Then, using the cut off wheel, or a sawsall, cut the bottom off of this bucket about 3 inches below where it rests on top of another bucket. I also removed the wire handle as it was in the way. Now, put the lid from earlier on the net pot and the net pot on top of the cut off bucket. Now you can drill a hole in the net pot lid for the quarter inch tubing that will come from the pump. Zip tie the power cord for the pump to the tubing to keep it stable and support the weight of the pump. The power cord goes through the side flap of the cut off bucket, and the tubing goes through the hole in the net pot. Leave 2 to 3 inches of tubing sticking out the top of the hole in the net pot and we will make a drip ring later. I would advise you to adjust the power cord, and drip tubing so that the pump hangs just above the bottom of the water bucket. If it rests on the bottom, you are likely to get an annoying vibration from the pump. I plan to modify this with a support that goes down the side of the cut off bucket when I go to a heavier water pump. But if you have the very small 40 gallon per hour pump, it can easily support itself from the power cord and water tubing. The drip ring is assembled from 8 or 9 of the plastic tees, with about 1 1/4 inch of tubing between them. One is turned facing out and goes into the tubing coming up from the pump, and the others are pointed inward to drip onto your grow medium. I added a small piece of tubing to a couple of these so that they would drip directly onto the rock wool where my clone is sitting. Put some water in the bucket, plug the pump in, and test the system to make sure that you don’t need to prime it and that it runs consistently without problems. You don’t want to find this out later when you check on it one morning and find your clone dried up because the pump failed.
Full bucket assembly
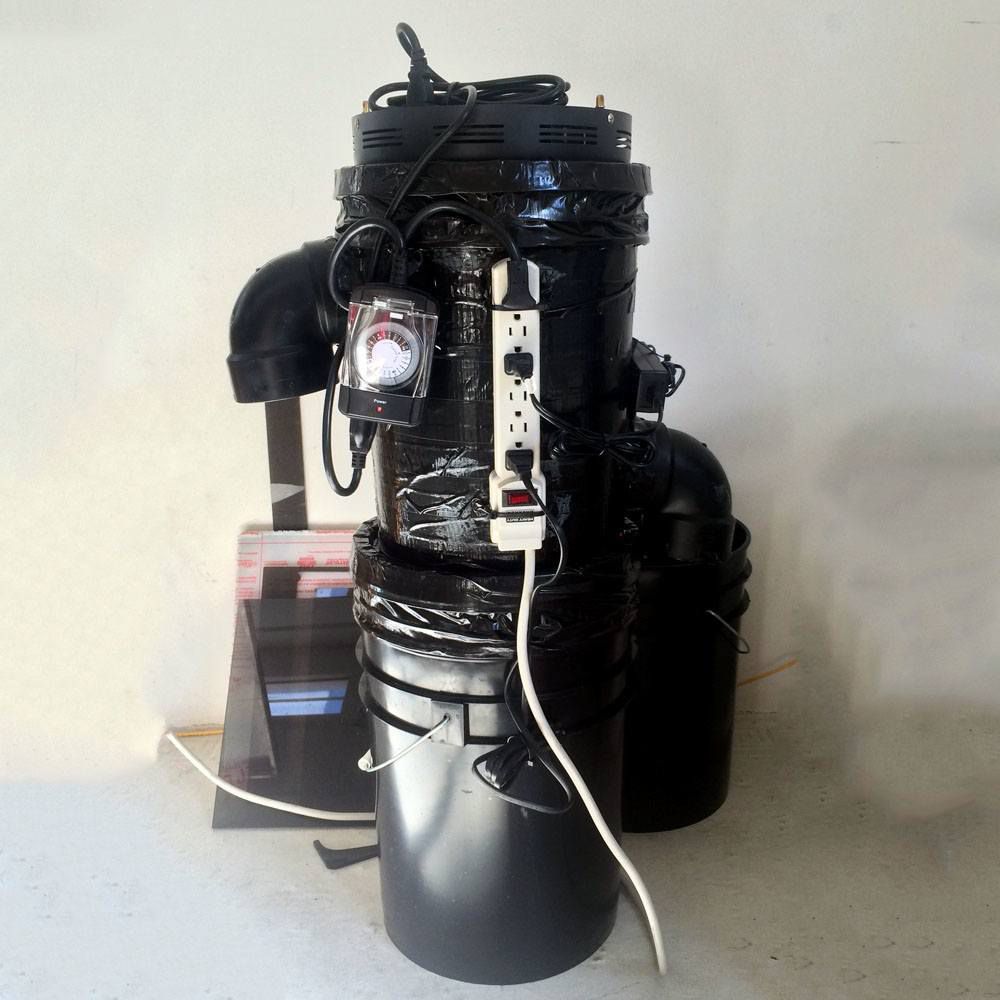
So, let’s build this thing! Put the aquarium pump in the water bucket, and feed the power cord and water line through the cut off bucket that you assembled earlier. Put the White lid that you cut with a thin lip on top of the net pot. On top of this goes the fan and light module. On top of this bucket goes the lid with the wider lip to fit the UFO light, and the UFO light goes on top of that. At this point, you need to arrange the cords for the aquarium pump, the power supply for the fans, and the UFO light so that they all join on the side of the fan light module. You can drill holes to zip tie a power strip to the side of the fan light module to accommodate all of the plugs. The other thing that you need to have on the fan light module is your timer module. The UFO light will plug into this, and it will plug into the power strip. This doesn’t have to be super neat, I assembled it so that everything was on one side up against the wall, so it’s not as obvious that there something going on with it to the casual observer. My advice is to let this run for a day or two with water in the bottom bucket, the pump running, and the fans, light, and timer running. This will ensure that everything is running correctly before you trust it with your precious plant… Later, as your plant gets taller, you will want to make a secondary light module in the form of the remaining white bucket with the bottom cut off, the remaining lid cut out like the one on the net pot, and the LED strips… I will update as I modify the bucket.